Introduction
In this blog, I will talk about some tricks that I learned when I worked on the data processing part for assignment 2 of XCS300. Here’s the link to the assignment.
This is how the data looks like:

Understand Dataset
In this assignment, we use the Omniglot dataset that has 1623 hand-written characters from 50 different languages.
Each character has 20 (28 x 28) images.
Running both the grader.py or main.py will download the dataset to local filesystem.
A folder named omniglot_resized will be generated under the src directory, and this is the structure of the directory:
src
|- omniglot_resized
    |- Japanese_(hiragana)
        |- character01
            |- 0488_01.png
            |- 0488_02.png
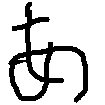
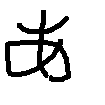
These are the examples of the character01 (あ) in Japanese:
Understand Test Cases
First thing first, we want to understand the unit tests.
Test_0
def test_0(self):
    """1-0-basic:  Basic test case for testing the output shape."""
    images, labels = data_gen._sample()
    self.assertTrue(images.shape[0] == self.K+1 and images.shape[1] == self.N and images.shape[2] == self.M, "...")
Basically, test_0 ensures the _sample() function returns:
K+1batchesNclassesMfeatures
Test_1
def test_1(self):
    """1-1-basic: Basic test case for checking the ordering from the support and query sets."""

    # Create a fixed order target labels for the sequence set
    target_labels = np.array([])
    for i in range(self.N):
        target_labels = np.append(target_labels, np.eye(N=1, M=self.N, k=i).reshape(-1))
    target_labels = np.tile(target_labels, self.B).reshape(self.B, self.N, self.N)

    # Check that the order of the sequence set is fixed
    self.assertTrue(np.array_equal(labels[:, 0].numpy(), target_labels), "...")

     # Check that the order of the query set is shuffled, i.e. not fixed ordered
    self.assertFalse(np.array_equal(labels[:, self.K].numpy(), target_labels), "...")
Basically, test_1 checks the order of the support set and query set:
- The support set should has the fixed order of examples
- The query set should has the random order of examples
for i in range(self.N):
    target_labels = np.append(target_labels, np.eye(N=1, M=self.N, k=i).reshape(-1))
The np.eye(N=1, M=self.N, k=i) function call is interesting, it generates a 1 X N identity matrix with a 1 at the i-th position:
| i | output array |
|---|---|
| i=0 | [1, 0, 0] |
| i=1 | [0, 1, 0] |
| i=2 | [0, 0, 1] |
The np.tile() function call repeats the label for B (batch size) times.
Let’s assume N=3, B=2. Here’s how the output looks like:
# After the np.append() call:
target_labels = [1, 0, 0, 0, 1, 0, 0, 0, 1]

# After the np.tile() call:
target_labels = [1, 0, 0, 0, 1, 0, 0, 0, 1, 1, 0, 0, 0, 1, 0, 0, 0, 1]

# After the reshape(B, N, N) call:
target_labels =
[[[1, 0, 0],
  [0, 1, 0],
  [0, 0, 1]],
 [[1, 0, 0],
  [0, 1, 0],
  [0, 0, 1]]]
Understand Helper Functions
Now let’s look into the helper functions.
Feature Dimension
config = {}
img_size = config.get("img_size", (28, 28))
dim_input = np.prod(img_size)
- The
.get()function returns value associated with the key"img_size". If key is not found, returns the default value(28, 28) - The
np.prod()function computes the product of array elements.
Feature Normalization
image = image.reshape([dim_input])
image = image.astype(np.float32) / image.max()
image = 1.0 - image
The above logic is used for image processing.
reshape([dim_input])converts 2-D image arrays into 1-D/image.max()scales the pixcel values to[0, 1]1.0 - imageflips the values so that0represents white and1represents black.
These tricks are used to normalize the input features.
Randomness
random.seed(1)
random.shuffle(character_folders)
- The
random.seed()function sets the seed for the randome number generator so that the sequence of random numbers become deterministic. - The
random.suffle()function will then returns a fixed shuffled folders
Get Sample Images
The get_images() helper function is very important:
def get_images(paths, labels, nb_samples=None):
    if nb_samples is not None:
        sampler = lambda x: random.sample(x, nb_samples)
    else:
        sampler = lambda x: x

    image_labels = [
        (i, os.path.join(path, image))
        for i, path in zip(labels, paths)
        for image in sampler(os.listdir(path))
    ]

    return image_labels
Let’s understand it bit by bit.
if nb_samples is not None:
    sampler = lambda x: random.sample(x, nb_samples)
else:
    sampler = lambda x: x
This is a sampler function. If nb_samples is specified, it samples that number of examples. Otherwise, it returns all examples.
image_labels = [
    (i, os.path.join(path, image))
    for i, path in zip(labels, paths)
    for image in sampler(os.listdir(path))
]
This piece of logic requires some understanding.
The zip() function creates a tuple:
lst1 = [1, 2, 3]
lst2 = ['a', 'b', 'c']
zip(lst1, lst2) # Output: [(1, 'a'), (2, 'b'), (3, 'c')]
Putting all the logic together, the get_images() function returns output like:
get_images(['omniglot/ch1', 'omniglot/ch2'], [[1, 0], [0,1]], 3)

# Output
[
    ([1, 0], 'omniglot/ch1/image3.png'),
    ([1, 0], 'omniglot/ch1/image8.png'),
    ([1, 0], 'omniglot/ch1/image15.png'),
    ([0, 1], 'omniglot/ch2/image1.png'),
    ([0, 1], 'omniglot/ch2/image2.png'),
    ([0, 1], 'omniglot/ch2/image5.png')
]
Implementation
Data Processing Logic
Here are some useful tricks to implement the data processing logic.
Since the get_images() function returns an array of tuples, one for labels and the other for images, we need to convert the array of tuples into two arrays. Here’s the trick:
# Input:
[(1, 'a'), (2, 'b')]

# Use zip() function
lst1, lst2 = zip(*tuples_array)

# Output:
lst1 = [1, 2]
lst2 = ['a', 'b']
Once we have the separate images and labels array, let’s see how to organize the data.
The following example shows how the labels array looks like and the transformation goal
# Input - all data in an array
[[1, 0], [1, 0], [1, 0], [0, 1], [0, 1], [0, 1]]

# Output - [B, K+1, N]
# B: batch size
# K+1: support set + test set
# N: number of classes
[
    [[1, 0], [0, 1],
    [[1, 0], [0, 1]],
    [[1, 0], [0, 1]]
]
To achieve this goal, we use the numpy slicing function with start:stop:step:
b = []
for i in range(3):
    b.append(a[:,:,3])
Data Type
In the description of the _sample() function, it says:
# PyTorch uses float32 as default for representing model parameters.
# You would need to return numpy arrays with the same datatype
At first, I didn’t pay much attention to it, and I just init numpy array from a regular python array object:
label_batch = np.array(label_batch) # np.float64
image_batch = np.array(image_batch) # np.float32
Some unit tests failed but I managed to “fix” the issue by casting the data type to np.float32 in the forward() function:
label_batch = label_batch.float() # override data type to np.float32
I got an error complaining about np.float64 when I trained the model on GPU.
Not only that, my implementation didn’t pass one of the hidden tests due to precision errors.
After some investigation, I figured out the right thing to do:
label_batch = np.array(label_batch, dtype='f') # np.float32
image_batch = np.array(image_batch, dtype='f') # np.float32